CIRCLE BOOGIE: ANIMATED MORPH ASSIGNMENT
Key Frame (or "Pose to Pose") Animation: Pose to Pose Animation, unlike its more intuitive cousin Straight Ahead Animation is a more calculated approach allowing animators to set up target (or key) drawings and test their effect before committing time to do a lot of extra drawings. It is also a great way to get director, client, or even professor approval before expending valuable resources on Inbetweens.
Here are some terms you should know:
Shooting in 1s, 2s, 3s, etc.: the amount of exposures per animation drawing based on 24 frames per second (FPS). For example shooting in 3s will require three exposures for a single drawing. As you can imagine the animation shot in 3s will take more screen time and will appear chunkier that animation shot in 2s or 1s. Anything above shooting in 3s is generally considered a timing test and will eventually have to be "inbetweened".
Frames per Second (FPS): This is the playback speed that allows us to control the speed of our animation. 24 FPS is the standard animation playback but often we can get away with 12 FPS. Similar to shooting in 1's, 2's, etc.. , the FPS can also be adjusted to make up for drawings that will be added later.
Arc: The path your animation follows between key frames. Arcs are established by your Breakdown drawings.
Rough Animation: (red line) The process typically begins with broad drawings that focus mainly on gesture, movement and energy. These drawings are done in rapid succession and tested by first flipping the drawings and then shot as a pencil tested to actual timing.
Keys: (blue line) These drawings are usually a cleaned-up version or a trace-off of the Rough Animation in an attempt to bring visual definition to the much rougher drawings.
Breakdowns: (blue line) These set the arc of your animation. If Keys are the targets then Breakdowns define the path. Breakdowns play a big part in defining the character of your motion.
Clean-up Pass: The Clean-up Pass happens once the Key/Breakdown pass is approved. This can be done on the same drawing with a clean black line after pushing back the colored lines with a kneaded eraser. Or the Clean-up pass can be a complete trace-off onto clean animation bond.
Inbetweens: Inbetweens effect the timings. The more drawings inbetween the Breakdowns and the Keys, the slower and smoother the animation will be. Strategically placed inbetweens give variance to timings by easing into some keys and snapping away from others. Inbetweens are typically done after the Keys and Breakdowns have been cleaned up. This means they need to be executed with a perfectly clean line strategically spaced between the Key and Breakdown drawings.
ANIMATION STEPS:
3. MODEL CHECK - CLEAN-UP KEYS & BREAKDOWNS
1. MORPH TARGETS - ROUGH ANIMATION
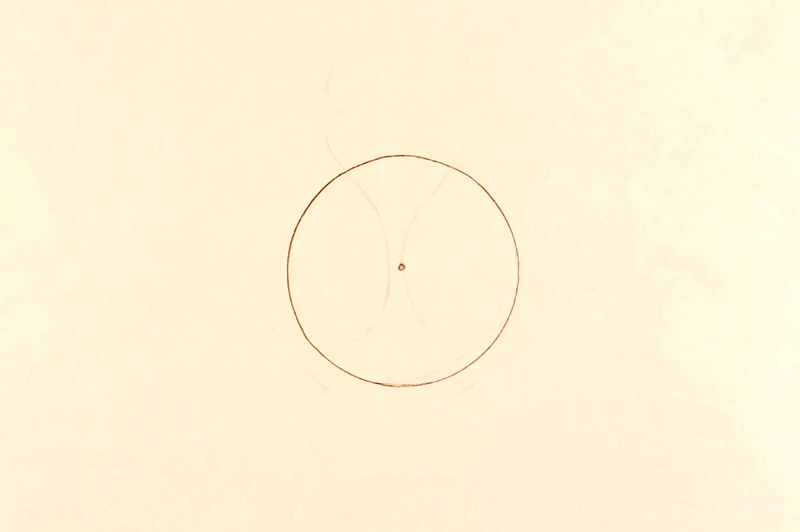
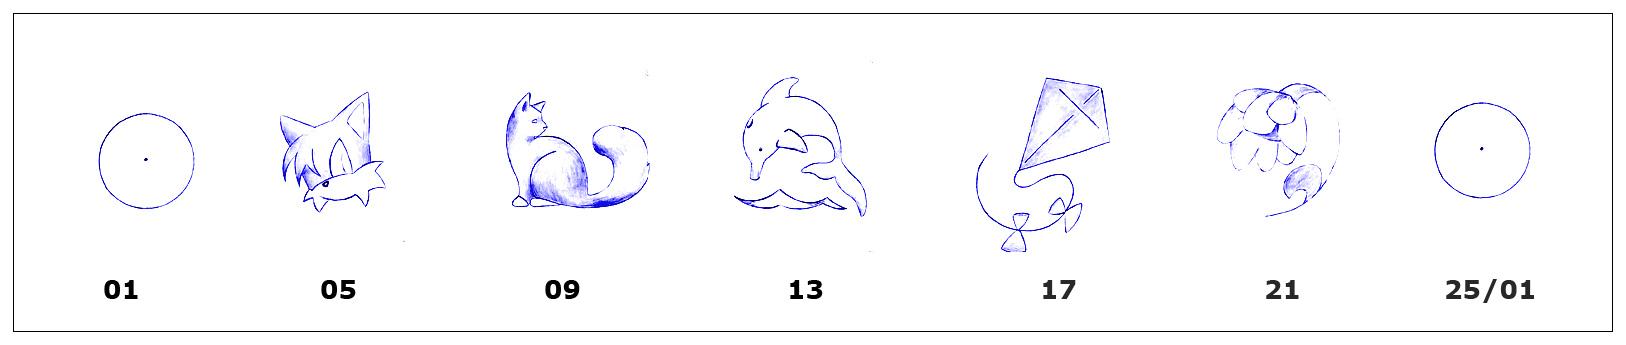
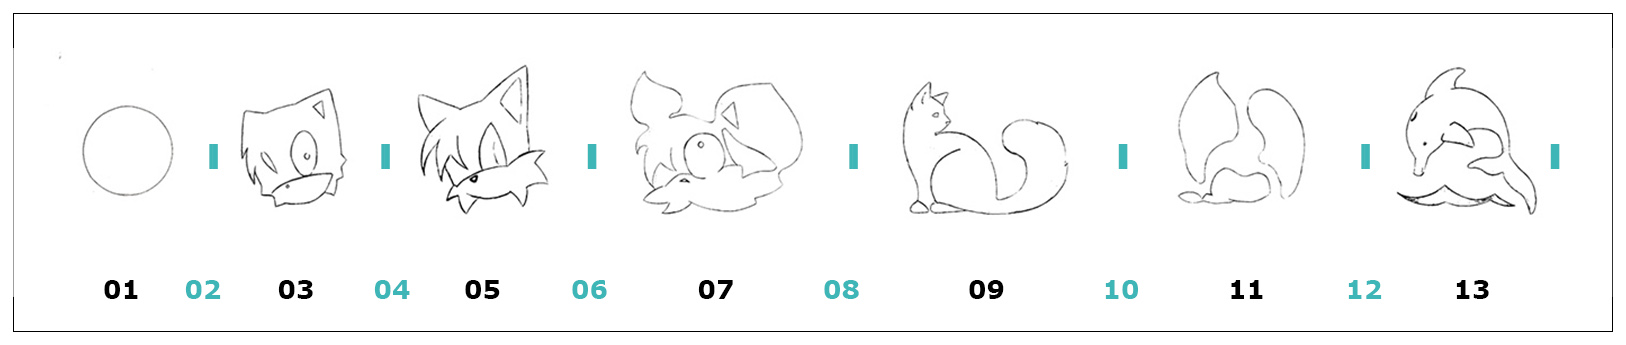
A. Start with a registered circle: Begin with a single 4" circle template drawing on registered animation bond
B. CREATE TARGETS: On separate sheets of animation bond, design 5 distinct drawings (Morph Targets) that will naturally morph from your circle, into each other sequentially, and then back to your original circle. You should draw these with a red pencil.
C. TEST DRAWINGS: Set up Dragonframe and shoot each drawing for 1 exposure including the first circle drawing. You should have 6 frames of animation. Set the playback to begin and end on #6, the last morph target drawing.
D. PREVIEW ROUGH ANIMATION: Press the Loop function and set your playback fps to "Custom/3" fps. This should give a sense of what your final pacing will be. If you are pleased with the way the images play off of each other you are ready to move on to the next step and refine your Key drawings. If not, rework your targets and test again. When you have a test animation that you are satisfied with export a movie @ 3 fps and post it to the discord #circleboogie channel.
*Make sure your Targets are approved before moving on to Keys & Breakdowns.
Assignment Specs:
- Each drawing exposed for 1 frame
- Playback in Dragonframe at 3 fps
- 16:9 HD Aspect Ratio (1920 x 1080)
- Final Quicktime movies should be exported as .mp4/H264
Naming: Work should be submitted to the class DROP BOX:
simpsonb_circleboogie_targets.mp4
2: KEYS AND BREAKDOWNS
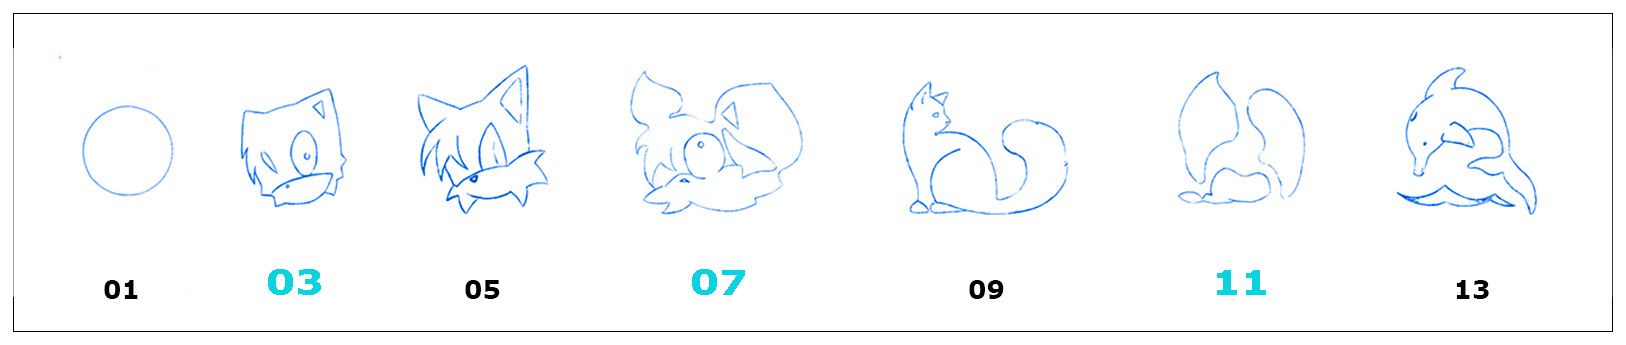
REFINE KEYS: Number and refine your Key drawings you can "push back" your colored line (red) with a kneaded eraser and draw directly over your original with a darker color (Blue). If your drawings are too dark to push back you can do a clean trace over them on a new piece of animation bond. Follow the numbering in the image below. Notice a single circle drawing works for both #1 and #25.
A. BREAKDOWN ANIMATION: The Breakdown is your chance to add some attitude to your motion so try to avoid amorphous interpolation that a computer might do.
Create Breakdown drawings between your Keys and number them as follow. Notice that Breakdown drawing 23 will be in-between of 21 and 01 (your original circle drawing).
Work with a blue line and draw between each Key drawing. Avoid straight interpolation by establishing clear arcs from one key to the next. The arc is the path your motion follows between keys. The drawings below are a great example of the Breakdowns adding extra interest between the Keys.
B. SHOOT LINE-TEST: Shoot all of your drawings again only this time on 4s (four exposures per drawing). With the additional Breakdown drawings, shooting on 4s will give you the identical 48 frames of animation.
Press the Loop function and play back your animation at 24 fps. Watch closely to make sure there are no "pops" and drawings are clearly following motion arcs. If you are pleased with your Breakdown animation you are ready to move on to the Clean-up pass. If not, make adjustments and test again.
When you have a test animation that you are satisfied with export a movie @ 24 fps and submit it to the @Dropbox.
Assignment Specs:
- Each drawing exposed for 1 frame
- Playback in Dragonframe at 6 fps
- 16:9 HD Aspect Ratio (1920 x 1080)
- Final Quicktime movies should be exported as .mp4/H264
Naming: Work should be submitted to the class DROP BOX:
simpsonb_circleboogie2_breakdowns.mp4
3: CLEAN-UP KEYS AND BREAKDOWNS
CLEAN-UP PASS: This can be done on the same drawing with a clean black line after pushing back the colored lines with a kneaded eraser, or the Clean-up pass can be a complete trace-off onto clean animation bond.
Using a sharpened black graphite pencil, you are now going to carefully draw over each drawing (Keys and Breakdowns). Sharpen your pencil often and pay close attention to creating clean and consistent line-work.
4: INBETWEENS
A. INBETWEEN PASS: Inbetweens effect the timings by slowing the timing and smoothing the motion between drawings. They are typically done after the Keys and Breakdowns have been cleaned up. This way they can be executed with a perfectly clean line strategically spaced between the Key and Breakdown drawings.
Using a sharp soft graphite pencil create Inbetweens for the drawings that are now missing. These will be all your even numbers (drawing 24 will be an inbetween of 21 and your original 01 circle drawing). These will be final drawings so sharpen your pencil often and pay close attention to creating clean and consistent line-work.
*Tip: Rotate your drawings over the light table to take advantage of your wrist's natural compass action.
B. SHOOT FINAL LINE-TEST: Shoot all of your drawings in 2s (Two exposures per drawing). Watch closely to see that your lines are consistent and that there are no pops in your inbetweening. If you are pleased export a movie. If not make adjustments and shoot again.
Specs for Circle Boogie Movie:
- Each drawing exposed for 1 frame
- Playback in Dragonframe at 12 fps
- Final Quicktime movies should be HD 1920 x 1080 H264
Submit Movie to @DROPBOX
simpsonb_circleboogie3_line.mp4
5. FINAL COLOR PASS
A. FINAL COLOR PASS: You are ready for the Color Pass. Lightly add color to your drawings with colored pencils. Instead of completing all colors on a single drawing at once (like you would with a coloring book), follow each color through the series of drawings to insure consistency. Using a light touch on the color will go faster and keep the strokes from competing visually with your animated line.
B. SUBMIT COLOR DRAWINGS: Submit Full Color Drawings for Combined Class Shoot for single take to preserve registration and continuity. While the teaching assistant will do the shooting it is your responsibility to make her job as simple as possible. Please regard the following:
- Drawings should be placed in a manila folder with your name on it.
- Drawings should be clearly number (lower right of drawing)
- Drawings should be stacked in order, lowest number on top.
Stephan Leeper/Central Michigan University 2022


